Tue, 30 Sep 2014
Changing the default browser in Debian
Note to self: the next time you want to change your default browser, here's how.
$ xdg-mime default chromium.desktop x-scheme-handler/http
$ xdg-mime default chromium.desktop x-scheme-handler/https
$ xdg-mime default chromium.desktop text/html
$ sudo update-alternatives --set x-www-browser /usr/bin/chromium
Wed, 17 Sep 2014
Fore Close

I thought it'd be a nice gesture to make up some signs for Casey. Actually, I just get a kick out of these. I'm probably the only one.
See the Housing Bubble Blog for some real news.
On Instacart Pricing Transparency
Stephen Klein, a biz dev guy from Instacart, emailed me to ask why I hadn't tried it yet. Here's my response:
Hi Stephen, I was excited to learn about Instacart offering deliveries from Costco. Unfortunately, your current pricing model makes deciding whether to use Instacart too expensive. It's not that your prices are too high. It's that I don't know if your prices are too high; that is, the cost of information is too high.
When deciding whether to use Instacart, my decision is between going to Costco or having Instacart go to Costco for me. In most cases, I would prefer to have Instacart go for me. (Sometimes, I might want to browse.) But to make the decision, I need to know how much it would cost me to use Instacart.
The current pricing model is not transparent enough to determine this cost. Your prices are not the same prices as those offered as Costco, so I don't know what the total cost of using Instacart is, and rather than spend the time trying to figure it out, I simply don't use Instacart.
My recommendation would be to change your pricing model to make explicit the cost of using Instacart. You could charge a fixed percentage above the Costco price, charge a higher delivery fee, or charge a per-item delivery fee, for example; whatever model would be both transparent and profitable.
Christian
Tue, 09 Sep 2014
Building Multi-Container Apps with Panamax
CenturyLink released a new open source tool for building and managing applications composed of multiple docker containers called Panamax. It's similar to fig in providing a file format for describing the docker images which make up your application, and expressing the links between the containers.
The files used by Panamax to describe an application are called templates, and Panamax expands upon the model provided by fig by allowing applications to be built from existing templates, i.e. collections of existing images, and by providing a web interface for building templates. Templates can be fetched from and export to any github repo.
You create a new Panamax application by using an existing template or starting with a single docker image from Docker Hub.
Building an app using a template
Below I provide an example of how to build an application using a Panamax template. I created a template for the Cube event-logging and analysis server. (There's also a copy of the template in the panamax contest repo, but it was built using a MongoDB image which has since been deleted from Docker Hub.)
We'll create a simple Hello World node.js app, which logs each request to the cube server.
Install Panamax
First, install Panamax as
described in the documentation. The current version of Panamax is distributed
as a Vagrant VM, running CoreOS. Panamax itself is three docker apps
that run in the VM: an API server, a web app that provides the main interface,
and cAdvisor, used to monitor
the docker containers. Panamax also includes a shell script,
panamax, which is used to start up the VM.
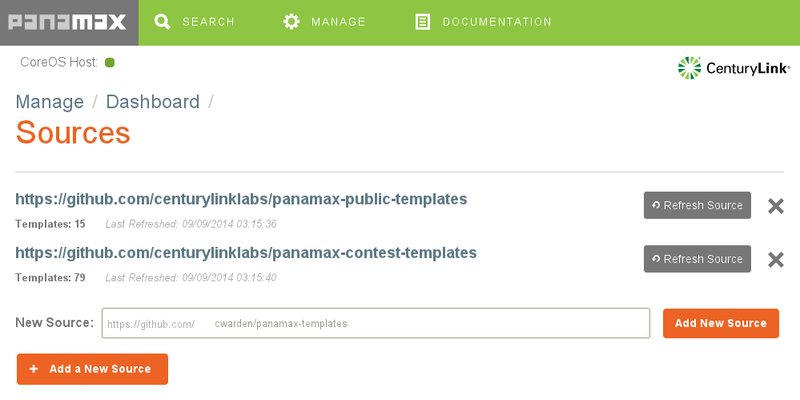
Add a Panamax Template Source
Panamax is distributed with two github repos containing templates. Navigate to
Manage | Sources to add my cwarden/panamax-templates repo as a
source of templates.
Searching for Panamax Templates and Docker Images
Now, on the search screen, if you search for "cube", you'll find my template.
(The first one is from the contest repo.)
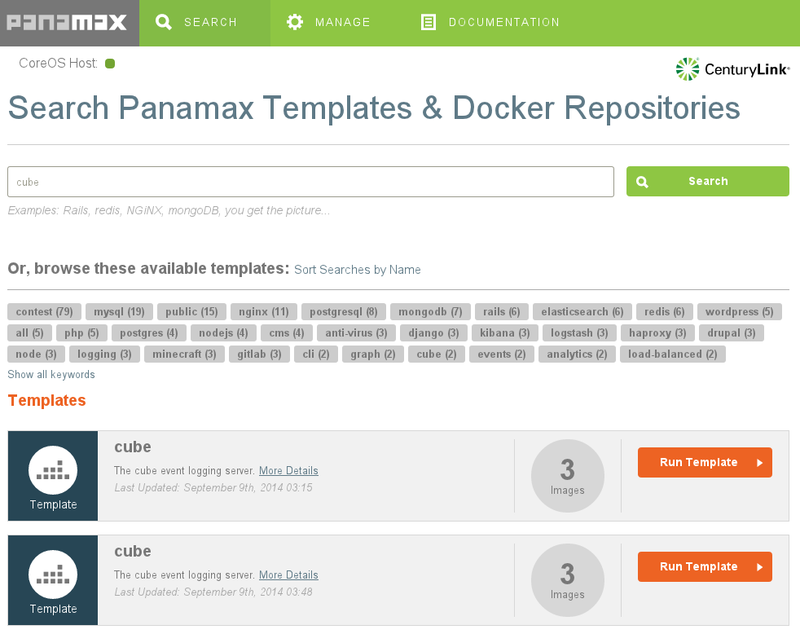
Below the templates, you'll also find individual docker images. If you wanted to build up your application starting from a single image, you could start with one of these.
Click on More Details, and you'll see that my template is made up of three docker images: a MongoDB database, the cube collector, which accepts events and stores them in the database, and the cube evaluator, which reads data out of MongoDB and computes aggregate metrics from the events.
The details modal window also shows documentation I wrote up when creating the template.
Creating an Application
Click on Run Template. This will create a new application called "cube".
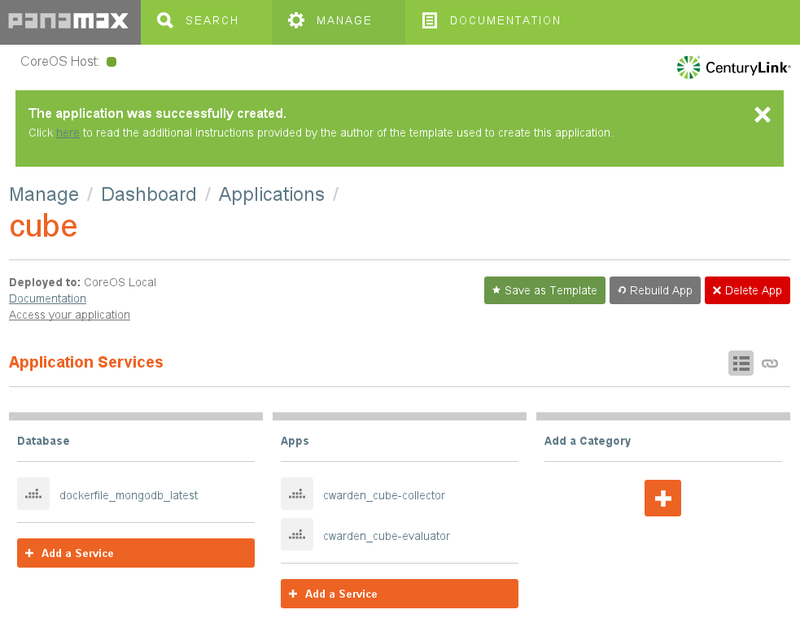
The Documentation link will show the same notes as on the More Details screen. The Port Forwarding section is important. Recall that Panamax and all of the docker containers it manages are running within a VM. If we want to access any of the services provided by these containers from outside the VM, we need to set up port forwarding.
In this case, we're going to add another docker container which sends data to the cube collector, but we'll want to access the cube evaluator from our host machine to make sure the logging is working correctly, so we need to set up port forwarding to VM for the evaluator:
$ VBoxManage controlvm panamax-vm natpf1 evaluator,tcp,,1081,,1081
(Instructions for sending data to the collector from the host machine are also included in the documentation.)
Prepare An App To Use With The Template
We'll use Valera Tretyak's simple hello world app for our application, making a small change to log each request to the cube collector.
Then we can create a docker image for this app and upload it to the Docker Hub.
$ docker build -t cwarden/hello-cube .
$ docker push cwarden/hello-cube
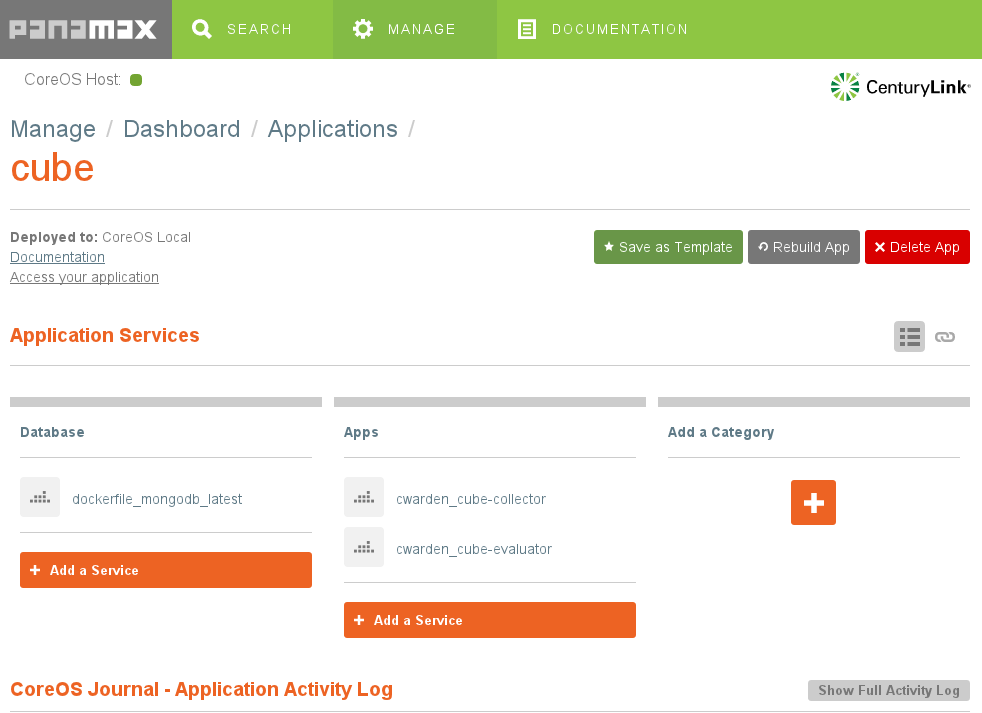
Extending The Template To Create a New Application
Now, let's actually use the template as a template by adding our new image as
another container. From Manage | Manage Applications | cube, let's add the
hello-cube service.
Next, we need to link the new container to the cube collector so it knows the
hostname and port to use when sending events. We also need to expose the
container's port to the VM. Click on the hourglass next to the hello-cube app.
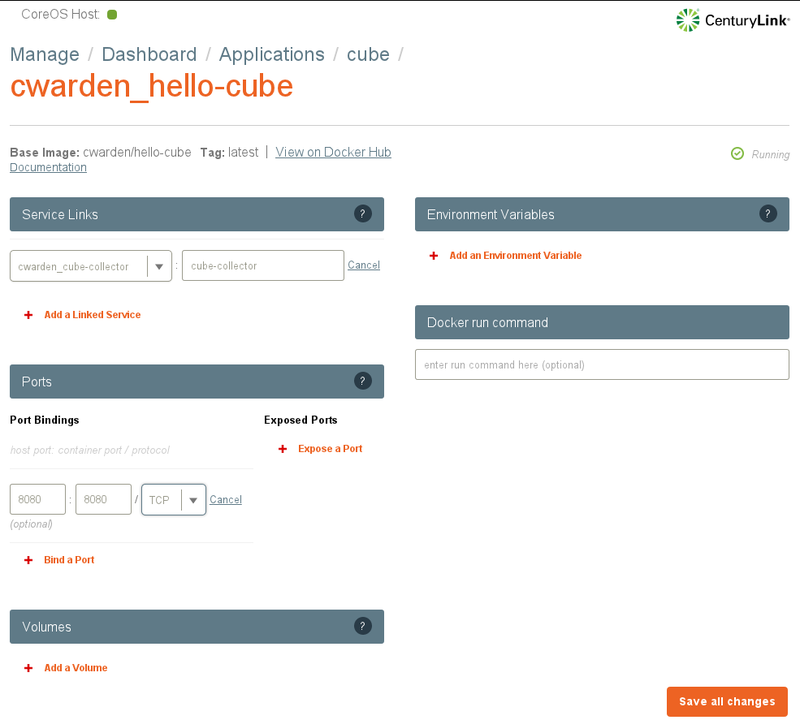
And we need to expose the VM's port to the host machine.
$ VBoxManage controlvm panamax-vm natpf1 hello,tcp,,8080,,8080
Using The New App
When we access the app on localhost:8080, it will send an event to the cube collector. We can use the cube evaluator to monitor the number of events being generated.
Exporting An App As A Template
Now that we've finished building our app, we can export the app as a new template to a github repo using the Save as Template button.
A Convoluted Solution to Google Drive for Linux
I need to use Google Drive to share files with coworkers. I tried using grive, but it crashed regularly.
The solution I came up with uses VirtualBox, a Windows 7 image, Google Drive for Windows, a tool from Microsoft called SyncToy, and the Windows task scheduler.
- Install VirtualBox
- Install a Windows image using ievms
- Share a folder from your linux host to your windows guest, e.g. /home/user/GDrive
- Install Google Drive in Windows, and configure to sync to your hard drive image, e.g. C:\Users\IEUser\Google Drive, not the shared drive; Google Drive won't sync to a networked drive.
- Install SyncToy, and configure it to sync between your Google Drive location and your shared drive, e.g. \\VBOXSVR\GDrive. Use the network name rather than the drive letter assigned to the shared drive for scheduled syncing to work.
- Create a scheduled task to run as IEUser whether the user is logged in or not (you don't need to run with the highest privileges). Set the trigger to one time, and repeat every 5 minutes indefinitely. Set the action to run "C:\Program Files\SyncToy 2.1\SyncToyCmd.exe" with the -R argument.
